
Replace Broken Latch on RV Storage Bin Door
Broken latches on storage bins are a common and frequent occurrence. They are cheaply made, luckily they’re quick and easy to replace. I purchase 4 or 5 at at a time to make sure I have them on hand when needed. They are relatively inexpensive on Amazon or e-bay.
They break when the plastic tip of the latch does not retract when it strikes the metal bracket on the door frame. To help prevent this, hold the handle open (plastic tips retracted) while closing the storage bin door. When tightly closed, release the handle to allow the plastic tips to engage the metal bracket. Never slam the door shut, a break is inevitable.
Tools required – Phillips screw driver, square head screw driver.
Materials – Replacement storage bin latch (old screws will need to be reused).
Steps to replace broken latch:

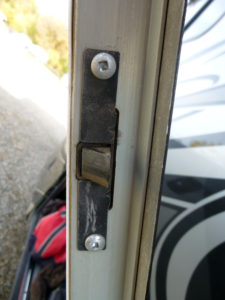
1 – Remove the 2 screws that hold the latch in place on the side of the storage bin door.
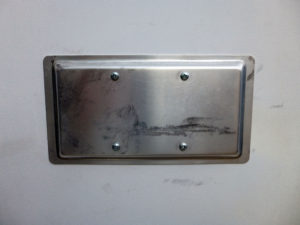
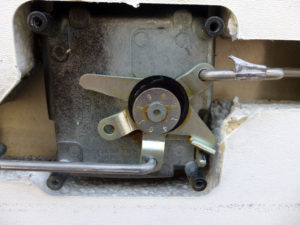
2 – Remove the 4 screws that hold the large metal plate on the inside, center of the storage bin door. Make sure you mark the holes where the 2 metal rods insert into the rotating bracket.

3– Carefully pull out the latch until the end of the latch bracket is clear of the door frame. Do not pull it all the way out, it may be difficult to thread the long rod back through the door.

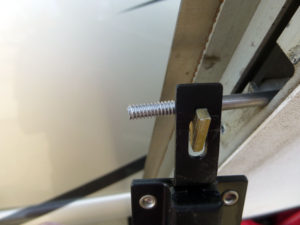
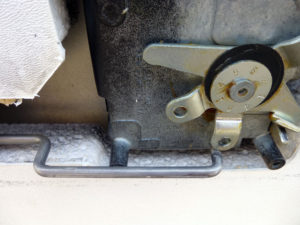
4 – Remove the tip of the rod, from the hole on the broken latch. Rotate the latch 90 degrees to align the slot in the bracket with the tab that holds it in place. You may have to twist and jiggle the bracket to clear the tab.
5 – Install the new latch by reversing the removal process. Made sure you do not put it in backwards.
6 – Replace the 2 screws that hold the bracket in place.
7– Re-insert the end of the rod into the correct hole.
8 – Make sure both rods are inserted fully into the correct hole.
9 – Replace the metal cover and 4 screws that hold it in place. The metal plate holds the ends of the 2 rods securely in place.
10 – Open and close the door handle to ensue both the latches, on either side, fully retract and extend. If not, one of the rods have come out of the holes. You must remove the plate, re-secure the rods into the holes, then re-install the plate.
11 – I put a little lubricant on the plastic tip and the mental loop. It makes closing the door easier, however they still seem to break on a regular basis.
Congratulations! You’ve repaired a common problem and saved a lot of money. At over $100 per hour shop rate, to install a $7.50 part, this is a “no brainer” even for the most novice RVer.
Note: This process is for a Fleetwood Bounder motor home. The steps and process should be similar on any RV. You my have to purchase a different replacement latch to match your RV.
Parts used in the above repair job.
Will these latches work for my 2008 fleetwood Jamboree class C motorhome lower exterior storage bins?
Not really sure. My guess is they are the same type latch because they are pretty “standard”. Best to take one apart then look for a similar one on Amazon or e-trailer.