
RV Storage Bin Repair
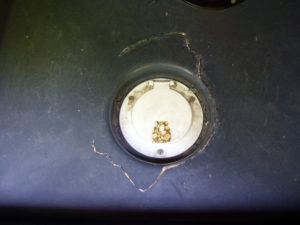
There are a continuing array of repairs required on any RV. To make matters worse, we cause some of them by being careless or lazy. One such repair was caused when I needed to move my motor home a few feet. I decided not to disconnect the power cord (lazy) because I had “plenty” of slack. Not so much. The attached cord held tight and damaged the floor of the storage compartment.

I cannot begin to imagine the cost to replace a storage bin or even to have a “professional” repair it. In reality, they probably would not even entertain a repair. After evaluating the damage, I felt I could adequately repair it for a few dollars and some cheap labor – mine. There are a lot of options, however this one seemed relatively easy and cost effective. I decided on Lexan sheeting, self tapping stainless steel screws, and silicone caulk. As far as required tools, I needed a hand held jig saw, saw blade, cordless drill, a phillips bit, drill bits, caulk gun, file or sand paper, some clamps, and a marker.
Directions:
Step 1 – Clean up the damage. Remove any burrs, loose or broken plastic, and dirt. Wipe down all surfaces with a damp cloth.
Step 2 – Dry fit the cleaned up sections and trim away any areas of “poor fit”. Keep damaged sections as complete as possible, but do not allow uneven overlap.
Step 3 – To prevent any cracks from spreading, drill a small hole at the end of each crack.
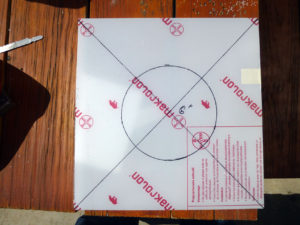
Step 4 – Make a pattern for your repair pieces from light card board or heavy paper. Make sure the pattern extends a couple of inches beyond any damage. In my case, I could used the same pattern for both the inside top and outside bottom pieces.

Step 5 – Determine the largest size repair piece that will fit in the allowable space. In my case it was a 12” x 12” piece for both. I used 1/4” thick Lexan due to it’s strength and flexibility. I ordered a 12” x 24” piece then cut it in half. It was less expensive then 2 -12” x 12” pieces.
Step 6 – Cut pieces to size with jig saw. Layout cut line, then clamp a straight edge parallel to the line. This will “guide” the jig saw to cut straight along the line. Trim away any areas that would interfere with a flush, tight fit.
Step 7 – Layout the center holes, drill a pilot “hole” in the Lexan so a saw blade can be inserted into the center. Cut the hole “free hand”. I had to cut a different size hole for the inside top and outside bottom. I cut both pieces with the smaller center hole, then enlarged the hole on the second piece to fit.
Step 8 – Use a file or sand paper to clean up and smooth all the rough edges. I tapered the exposed edges to prevent cuts or damage to things I would later put in the storage bay.
Step 9 – Dry fit the 2 cut pieces. Determine any interference and trim it off.
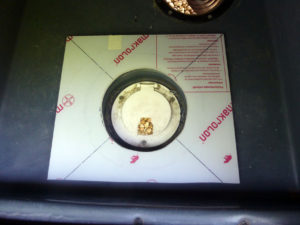
Step 10 – Place the top piece in place inside the storage bay. Place the bottom piece in place outside, aligned below the top piece, “sandwiching” the bay material between the 2 sheets of Lexan. Insure the 2 pieces of Lexan are flat, in contact with the bay material, and all interference is trimmed away. Using a marker, draw the outline of both pieces onto the bin material.
Step 11 – When dry fit is complete, remove both pieces. Completely cover the surface of the top piece with silicone caulk, put in place, with silicone contacting the upper bin surface. Repeat the process with the outside piece of Lexan. Using clamps placed through the hole, clamp the two pieces in place. Silicone will need to be wiped up as it is squeezed out.
Step 12 – With the two pieces held snugly in place with the clamps, drill several pilot holes through all three layers. Holes should be into solid, undamaged areas, away from cracks.
Step 13 – Using the cordless drill, drive self tapping screws from inside to outside. Make sure the screws penetrate all three layers. You may have to hold the 2 pieces in place with your hands for better contact. If any screws are loose, retract them, apply pressure, from the bottom, with your hand, then re-drive the screw into place. Take care not to drill your hands or drive a screw into them. Go inside to outside because you do not want the sharp screw tips inside the bay. Bolts, washers, and nuts could also be used., again bolt heads on the inside.
Step 13 – Now drill more pilot holes over the entire sheet of Lexan. Make sure the damaged areas are completely covered and held together with the screws.
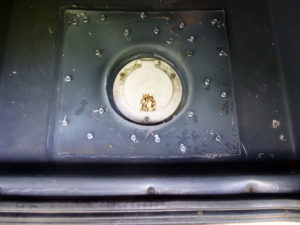
Step 14. Apply silicone around all the edges of the Lexan to seal them from moisture and water. Smooth and level the silicone. Let it dry for several hours before loading the repaired storage bin
This repair only took a couple of hours and cost less than $30. After 6 months, the repair is working as expected.
List of Materials
Lexan: 2 pieces, 1/4″ x 12″x 12″
GE Silicone caulk: 1 – 12oz tube
Self Tapping Screws Stainless Steel – pack of 25
List of tools:
Jig saw and blade
Cordless drill and bits
Clamps
Caulk gun
File or sand paper
Cardboard or heavy paper
Marker
Rags for clean up
Parts used in above repair: